
DANGER - YOUR CENTRAL HEATING SYSTEM CONTAINS HOT WATER WHICH CAN SCALD OR BURN!
Before attempting to remove any radiator, your central heating system must be switched off and all radiators left to cool fully.
Please study these instructions carefully!
The water in your heating system is likely to be dirty. Always protect the working area with worksheets or similar to reduce the risk of accidental spillage during the radiator draining process.
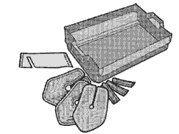
 1. Your Kit Contains the following:-
1 x Universal application Radiator Draining Tray plus
4x Water Diverting Collars for 8mm, 10mm, 15mm & 22mm pipework.
Re-useable Sealing Strips and Water Resistant Barrier Gel (sufficient for 6-8 applications).
2. Identify both the FEED and RETURN VALVES on the radiator you wish to drain (one on each side at the bottom of the radiator) and ensure that they are fully turned off.
Slacken the BLEED SCREW (situated at the top of the radiator) to release residual pressure then re-tighten.
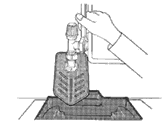
3. Position the draining tray towards either the feed or return pipe. As radiators are often positioned at varying levels, a support beneath may be required.
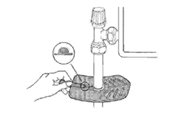
 4. Select the correct size of Diverting collar - 8mm, 10mm or 15mm. Tear off the end of the Sealing Compound gel and apply a bead of gel around the circular hole in Diverting Collar.
 5. Clip Diverting Collar around pipe and slide a length of sealing strip (rounded edge uppermost) along the slit at rear of collar up to the pipe.
This seals the back of the collar.
 6. Twist Diverting Collar through 90' positioning the Sealing Strip at rear.
Using your finger smear the bead of gel against the pipe to help achieve a water resistant seal.
 7. Once the collar and tray are correctly in position and the surrounding area is protected, using the correct size of spanner, open the union - SLOWLY! Water will now flow from the union and into the draining tray. Should the flow of water slow during this process, do not undo the union further, but carefully open the BLEED SCREW to aid the flow of water.
IMPORTANT: do not undo the union or remove bleed screw totally until the radiator is fully drained.
8. As radiator sizes vary, so does the volume of water contained in the radiator. To ensure that the Radiator Draining Tray does not become too full before the radiator is fully drained, the union may be re-tightened during the draining process to facilitate the emptying of the tray.
You may find it useful to have a bucket on hand for this purpose.
9. The directions contained in points 1-7 should be repeated until the radiator is fully drained and ready for removal.
After use, clean and store the RADIATOR DRAINING KIT for further use.